A Music visualizer is the software that can generate animated imagery that follows loudness, frequency spectrum, and rhythm of audio music. This tool offers a wide range of options to use visualization templates. A visualizer always appears in media players, particularly audio players. What about Spotify Visualizer? Is there a visualizer app on Spotify?
The Spotify app had a built-in music visualization tool. However, Spotify had disabled the visualizer function for some reason. Before deleting the visualizer, the user will type “spotify: app: visualizer” in the search bar to find Spotify Visualizer. But now, users can only use third-party music visualization tools to visualize Spotify music. Following is a handpicked list of Top Spotify Music Visualizers, with their popular features and website links. The list contains both open-source (free) and commercial (paid) software.
Kaleidosync is an online Spotify visualizer. Kaleidosync offers different customizable visualizers and lets you enjoy music visualization on full-screen. There’re six visualization themes for you to select. It also allows you to adjust the shape of the animation by changing brightness, sides, and more. To use it, you should enable JavaScript on your browser or it can’t work properly. Firstly, you need to sign in with your Spotify account. It only works if you listen to entire songs on Spotify.
How to use Kaleidosync Spotify visualizer?

AudioVisualizer is a Google Chrome extension that works with Spotify and allows users to create custom visualizations based on the music being played.
How to use AudioVisualizer?


Wavesync Spotify Visualizer is also a web service that works through your internet browser to view the images produced by music waves on your computer. It is another HTML5 music visualizer for Spotify made by the same author of Kaleidosync – Zachwinter. To use it you have to go to its home page; login with your Spotify username and password; open a Spotify session in parallel and play your music. There are several themes to choose from to display the image, but remember that each creation is unique depending on the type of music.
Unlike the previous two, Tessellator is a free live music visualizer for Spotify Premium users only. It works the same as the previous two visualizers. You have to enter its website, log in with your Spotify account, open Spotify and start playing. The main differential of Tessellator is that it shows images with 3D objects, from pyramids to surfaces, which creates a quite particular effect. It is worth trying.
Butterchurn Music Visualizer Extension is a third-party extension for Google Chrome browser that allows users to use the Butterchurn music visualization software in their browser. It can be installed as a browser extension and then used to create real-time visualizations that respond to music played on websites like YouTube, SoundCloud, and Spotify.
The Butterchurn Music Visualizer Extension uses WebGL and Three.js to render its visualizations and offers a variety of customization options, including different presets, color schemes, and texture options. It can also be used with live audio input from a microphone or audio files on the user’s device.
One of the main advantages of using the Butterchurn Music Visualizer Extension is that it allows users to create music visualizations while listening to music on their favorite websites. It can also be used as a standalone music visualization tool, offering high-quality real-time visualizations that respond to the user’s music.
It’s worth noting that the Butterchurn Music Visualizer Extension is a third-party tool and may not be officially supported by the websites on which it is used. Additionally, it may use a significant amount of system resources, so users should ensure that their computer meets the necessary specifications before installing the extension.

PotPlayer can be used as a handy music visualizer for Spotify. It works because the visualization graphics and lines within the player can be activated when there are songs playing in your system, including music streaming from Spotify. Besides, you can use PotPlayer to record the screen, thus saving the effects as a video to share.
This is a free and open-source music visualizer software that can be used with Spotify. It features various visualizations including 3D animations and a real-time audio analysis system.
This is a popular visualizer plugin for the music player Winamp, but it can also be used with Spotify. It offers over 2,500 pre-made visualizations and allows users to customize and create their own.
Here is how to run Visualizations with Spotify (requires Winamp)(Windows).
You may have to enable “Stereo Mix”, in your sound card, instructions here: https://www.youtube.com/watch?v=Bd3moKLV5sE
Requirements: Windows 7/8/8.1/10/11 (32 or 64 bit)
Plane9 is another free and customizable 3D music visualizer that can be used with Spotify. It features a variety of visual effects, including particle systems, fractals, and more. The visualizer can be used either as standalone window, screensaver, oculus rift or HTC Vive VR visualizer. It is sound sensitive and reacts to what your currently listening to, be it from spotify, iTunes or any another sound source, it can even react to what you record from a microphone or other input.
Requirements: Windows 7/8/8.1/10 (32 or 64 bit)
Bazik is a music visualizer software that generates visual effects based on the audio input it receives from a built-in mic or any other audio input. These visual effects are designed to be simple yet striking, enhancing the overall visual experience of the music being played. Bazik is commonly used by musicians, DJs, and music enthusiasts as a live visual performance tool.

Requirements: OSX 10.7/10.8/10.9 ++ and PC Windows 7/8 ++
Rainmeter is an open source desktop customization tool for Windows that allows you to display customizable skins on your desktop, from hardware usage meters to fully functional audio visualizers.
Other music playback programs that have their own viewers are iTunes, VLC, and Windows Media Player. In this case, if you want to see their images you will have to play the Spotify music from your computer in these programs. However, Spotify uses DRM technology and restrictions to control the use of its media content. You can’t take Spotify music outside of Spotify app and play it on other players like VLC, Windows Media Player or other players with a music visualizer. How to play Spotify music on other music visualizers?
If you would like to play Spotify music on other music visualizers, like iTunes, VLC, etc. It’s necessary to remove DRM from Spotify music and convert Spotify Ogg Vorbis to MP3, FLAC, WAV or other plain audio formats that are playable on your target music player. For this purpose, Pazu Spotify Converter is highly recommended.
Pazu Spotify Converter is really a fantastic tool to download and convert Spotify audios to plain MP3, M4A, AAC, FLAC, WAV or AIFF at fast speed with the original sound quality preserved. With an advanced DRM decrypting technique, all the ID3 tags including title, artwork, artist, album, genre, track number will be kept for better organizing your music library. Let’s follow this guide to download and convert Spotify music, then play the converted Spotify songs on other music visualizers.
Download, install and run Pazu Spotify Converter on your Mac or Windows. Log in your Spotify account with the built-in web player.

Click the gear icon on the top right corner. Here you can select output format (AUTO(M4A)/MP3/AAC/FLAC/WAV/AIFF), choose output audio quality, customize the output path, organize the output files in various ways, rename output files and more.

Use the integrated Spotify web player to search the songs, albums, playlists or podcasts you want to download. Click the Add to list button to load all songs in the album or playlist, uncheck the songs you don’t want to download if there are any.
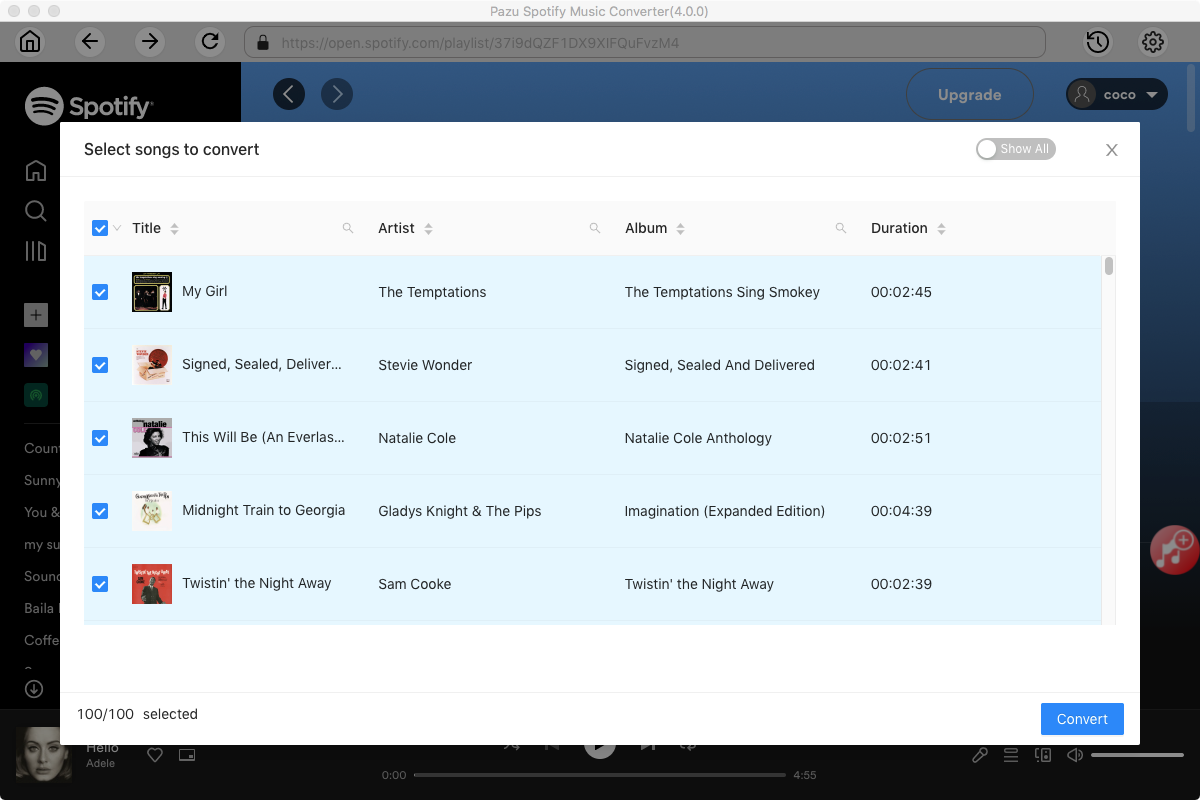
Click Convert button to start downloading the Spotify songs to your local computer.
When the conversion is done, click below folder button to get the converted music. Now you can enjoy them with above visualizers.

1. In the iTunes app on your PC, click “File” and select “Add File to Library” to import the converted Spotify Music songs(MP3/M4A) into iTunes library.
2. A song needs to be playing before you can use the visualizer. Play a converted Spotify song on iTunes.
3. Turn on visual effects: Choose View > Visualizer > Show Visualizer.
To change options, choose View > Visualizer > [option]. For example, to show or hide music videos, choose View > Visualizer > Play Videos. A tick means that videos will be shown. (Not all visualizers support options, so Options may be dimmed.)
Tip: To show or hide a list of commands you can use to control the visualizer, press the Question Mark key (?) on your keyboard while the visualizer is on.
4. Turn off visual effects: Choose View > Visualizer > Hide Visualizer, or press the Esc key.
1. Play the converted Spotify songs on VLC.
2. From the VLC Menu click on Audio > Visualizations and then select a visualization.

3. You can also select visualizations by right clicking while your audio is being played. From the right click media go to Audio > Visualizations and select a visualization.

4. The default available visualizations are Spectometer, Scope, Spectrum, Vu Meter, Goom and ProjectM. They all have their own style. Switch between them and select the one you like.

5. Turning off Visualizations in VLC: From the same menu where you accessed visualization Audio > Visualization or right click > Audio > Visualizations click on the option that says “Disable”.


Download and convert any Spotify songs, albums, playlists to MP3/M4A etc.