With an Apple Music subscription, you can access to a vast library of over 100 million songs. You can add songs to your Library, create playlists, and download tracks for offline listening. As your music tastes evolve, you may want to remove old songs to make room for new favorites, or delete downloaded songs to make more space on your device. This guide will walk you through the process of deleting songs from Apple Music on various devices. We’ll explore the differences between removing songs from your Library, playlists, and downloads. Plus, we’ll also provide a tip on how to back up your Apple Music songs.
1. Quick Tips for Adding and Deleting Apple Music Songs
Tip 1. Sync Library
With Apple Music’s Sync Library feature, your music library can be accessed across all your Apple devices, and songs deleted from Library and playlists will also be synced to all the devices linked to your Apple ID.
Tip 2. Adding Songs to Library When Adding to Playlists
When you come across a song you like on Apple Music, you can click the three dots and choose between “Add to Library” and “Add to Playlist“. Both actions will make this song appear in your Apple Music across all devices if you have turned the Sync Library feature on.
However, a song will not automatically be added to your Library unless you enable the “Add Playlist Songs” feature. Whether a song is added to Library will affect its download and removing (Tip 3 & 4).
Here is how you can enable “Add Playlist Songs” feature on different devices:
On iPhone
Go to Settings > Music on your iPhone or iPad.
Turn on “Add Playlist Songs” under LIBRARY.
On Android
Open the Apple Music app. Tap the three dots in the top right corner and select “Settings.”
Turn on “Add Playlist Songs” under LIBRARY.
On Mac
Launch the Music app, and select Music > Settings from the top menu.
Go to the Advanced tab, and check the box next to “Adding Songs to Library When Adding to Playlists.”
On Windows
Choose Edit > Preferences from the iTunes menu
Click General, then deselect “Add songs to Library when adding to playlists.”
Tip 3. Add a Song to Library before Downloading
To download a song to your iPhone or Android device, you must first add the song to your Library. However, on your computer, adding a song to a playlist is sufficient for downloading.
Tip 4. Deleting Songs
Removing from Library: Deleting a song from your Library will remove it from all your devices, including any downloaded versions.
Removing from Playlist: Removing a song from a playlist will not delete it from your Library or any downloaded versions.
Deleting Downloaded Songs: Deleting a downloaded song from one device will not affect the same song on other devices, as long as it remains in your Library.
2. How to Delete Songs from Apple Music Library?
Follow these steps to delete songs from your Apple Music Library. This method applies to your iOS, Android, Mac, Windows, and even the Apple Music web player.
Keep in mind that removing a song from the Library will delete it from all of your devices with the Sync Library feature enabled.
Go to the Library of your Apple Music and select Songs.
Find the song you want to delete, click the three dots next to the song, and choose Delete from Library.
3. How to Delete Songs from Playlists on Apple Music?
Use the following steps to remove songs from Apple Music Playlists.
Go to the playlist on your Apple Music and find the song you want to delete.
Click the three dots of the song and select Remove from Playlist.
4. How to Remove Downloaded Apple Music Songs?
The procedures for removing a downloaded song vary across mobile devices and computers.
On iPhone and Android
Open the Apple Music app on your phone or tablet, go to Library, and select Downloaded.
Select Songs under the Downloaded section.
Find the song you want to remove, tap the three dots next to the song, and select Remove Download.
On Mac
Launch the Music app on your Mac and go to Library.
Click View from the top menu bar and select “Only Downloaded Music.“
Now only downloaded songs are shown in your Apple Music Library. Click the three dots next to the song you want to delete and select Remove Download.
On Windows
Open iTunes on your Windows PC and click Downloaded in the left sidebar to view your downloaded items.
Right-click the song you want to delete and select Remove Download.
5. How to Remove All Songs Downloaded from Apple Music?
If you want to free up storage on your device, Apple Music allows you to delete downloaded songs all at once. Follow these steps to clear Apple Music downloads on your phone, tablet, and desktop.
On iPhone/iPad
Go to Settings on your device and select Music.
Scroll down and tap Downloaded Music.
Your downloaded music is listed by the artist. Tap Edit at the top right corner.
Tap the delete icon (the rounded minute icon) of All Songs.
Select Delete. All your Apple Music downloads will be removed.
On Android
Open the Apple Music app on your Android phone or tablet. Tap the three dots at the top right corner and select Settings.
Select Downloaded Music.
All your downloaded music is listed by the artist. Tap the three dots at the upper right and select Edit.
Tap the rounded plus icon of All Downloads.
Tap the delete icon (the recycle bin) at the top. All your downloaded songs will be deleted.
On Mac
Launch the Music app on your Mac and go to Library.
Click View from the top menu bar and select “Only Downloaded Music.“
Use “Command + A” to select all downloaded songs.
Right-click the songs and select Remove Download from the pop-up menu.
On Windows
Open iTunes on your Windows PC and go to Library > Downloaded in the left sidebar.
Press “Ctrl + A” on your keyboard to select all downloaded music.
Right-click the songs and select Remove Download.
6. How to Back Up Apple Music Songs to MP3
By downloading Apple Music songs as MP3 files, you can save them even if removed from the Apple Music Library. An effective method to achieve this is through Pazu Apple Music Converter, a reliable and secure tool compatible with both Mac and Windows. This converter allows you to batch download Apple Music playlists, albums, and songs to MP3, AAC, FLAC, and other popular formats without the need for iTunes or the Music app.
Pazu Apple Music Converter not only downloads your favorite playlists and songs but also preserves the original audio quality, ID3 tags, and metadata, ensuring you won’t lose any important information. Notably, the converter has a remarkably fast download and conversion speed—almost 10 times faster than comparable software. After downloading, you can transfer the downloaded tracks to any other compatible device for added convenience.
Key Features of Pazu Apple Music Converter
Download Apple Music songs, albums and playlists
Save Apple Music as MP3, M4A, etc.
10x Fast Music download speed
Lossless audio quality
Keep original ID3 tags & metadata
Play downloads on any device
User-friendly interface
Follow the tutorial below on how to download Apple Music to MP3 with Pazu Apple Music Converter.
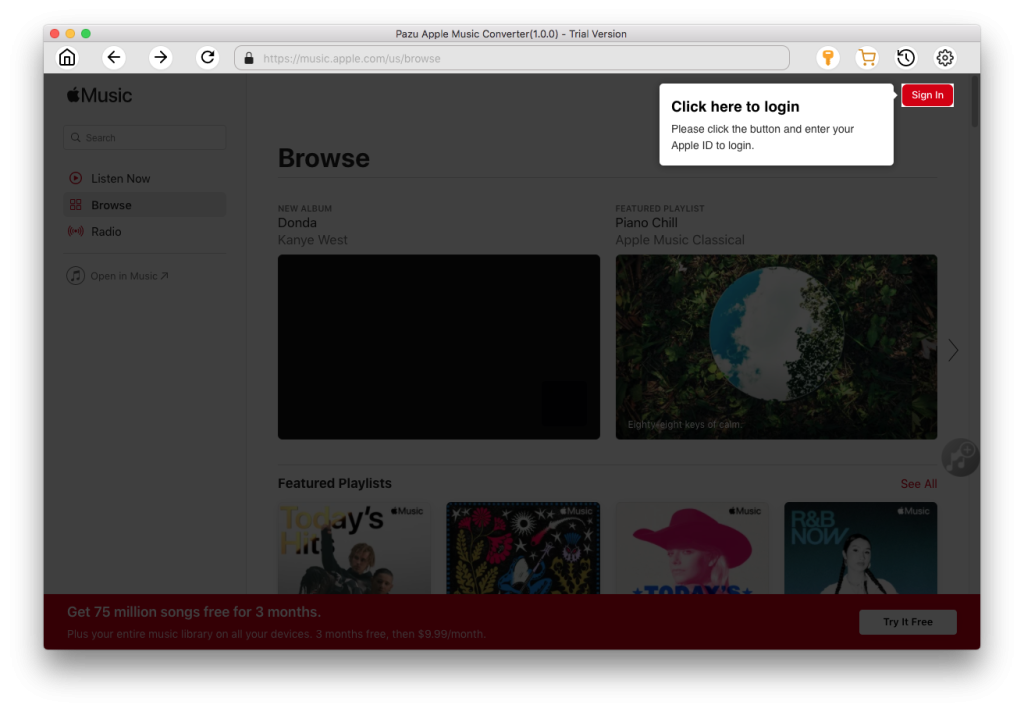
Step 1. Launch Pazu Apple Music Converter
Download, install and run Pazu Apple Music Converter on your Mac or Windows.
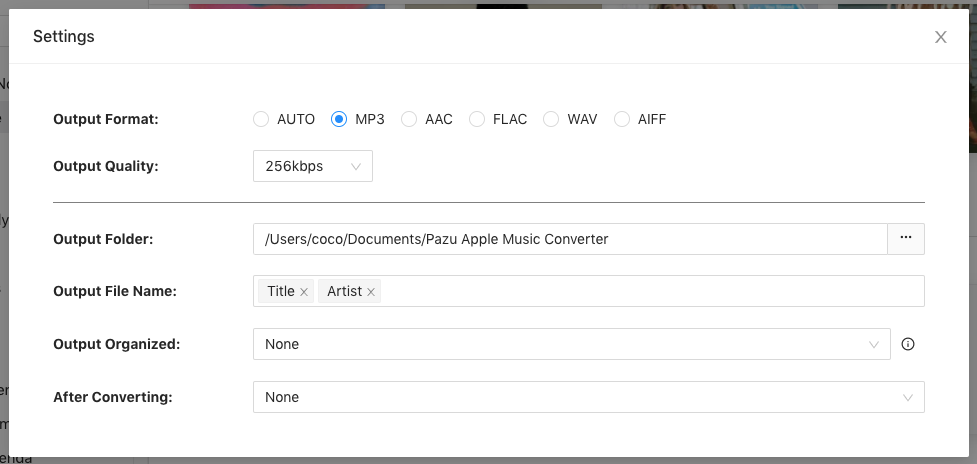
The default format is M4A in 256kbps. Apple Music Converter also supports MP3, AAC, FLAC, WAV, and AIFF. Click the gear icon if you want to change the output format or output folder.
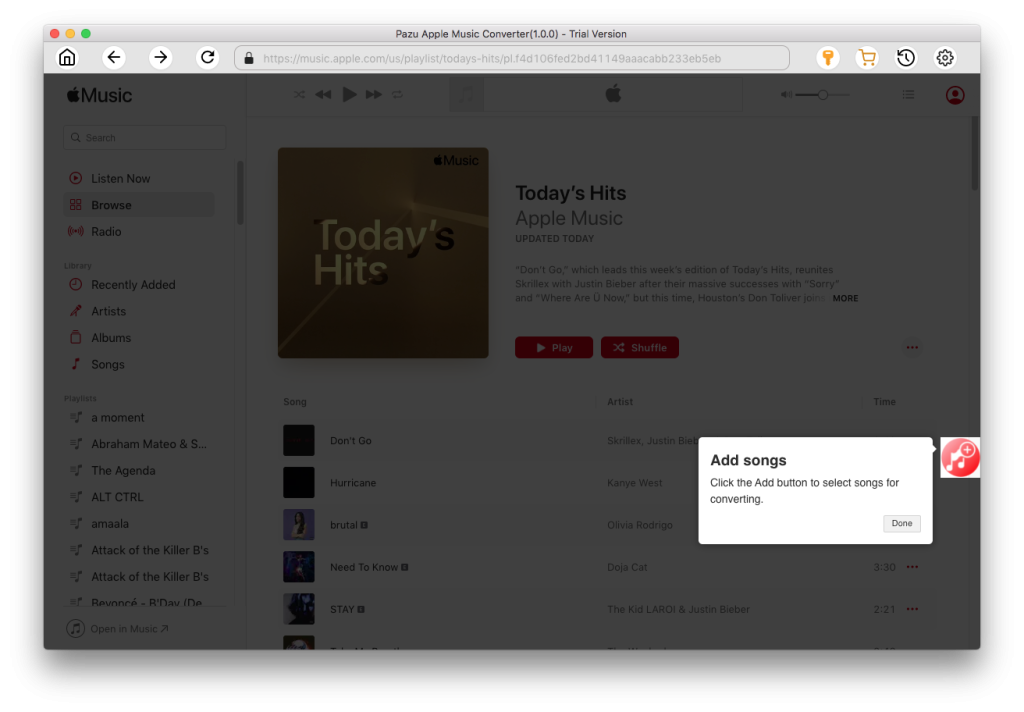
Step 3. Choose a playlist, artist, or album you want to download
Follow the on-screen instructions to choose a playlist, artist, or album that you want to download.
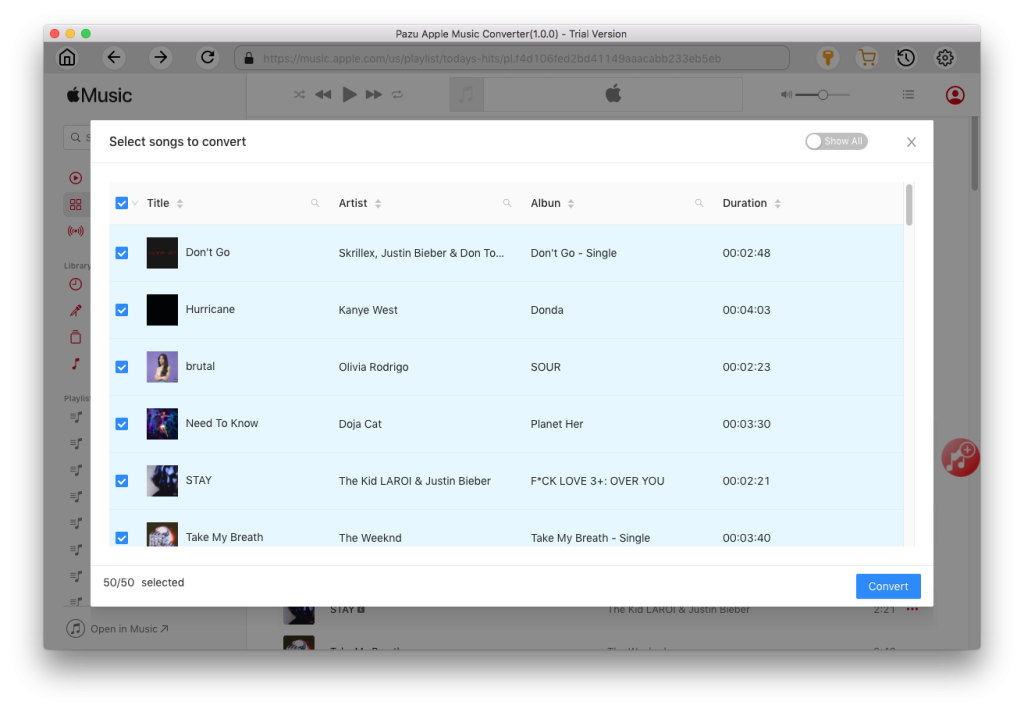
Step 4. Start to download Apple Music songs
Click the “Convert” button to start downloading Apple Music songs, albums, and playlists to MP3.
5. Locate the Converted Songs
After the conversion process is complete, click on the clock icon in the upper right corner to access the converted Apple Music songs. To locate the converted Apple Music songs:
You can either click the folder icon to open the output folder where the songs are saved; or
Directly go to the output folder you customized in the previous step.
Now that you’ve successfully converted your Apple Music songs to MP3, you can play them anywhere you want, even after canceling your Apple Music subscription.