Spotify is a widely used music streaming service that offers a diverse collection of playlists, both user-generated and Spotify-curated. It also allows you to create collaborative playlists with your friends. If you want to back up your playlists or analyze your listening data, exporting your Spotify playlists to Excel files is one of the best options.
Although Spotify doesn’t provide a direct feature for playlist export, there are third-party tools to help you with this task. In this guide, we will show you how to efficiently export Spotify playlists to Excel CSV files and how to import them back into Spotify, all with just a few simple steps.
Exportify is an open-source application on GitHub that can export your Spotify playlists to CSV format. This online tool offers a user-friendly interface and uses the official Spotify API to complete the task. Below is a step-by-step guide on transferring your Spotify playlists to Excel CSV files with Exportify.
Step 1. Visit the Exportify website (https://watsonbox.github.io/exportify/) on your browser and click the “Get Started” button.
Step 2. Log in to your Spotify account. By clicking on the AGREE button, you grant Exportify permission to access your Spotify account data and activities.

Step 3. Once connected to your Spotify account, Exportify will show all your playlists from your Library, including collaborative ones. Click the “Export” button next to a playlist to export it as a CSV file. To back up all your playlists, click the “Export All” button.
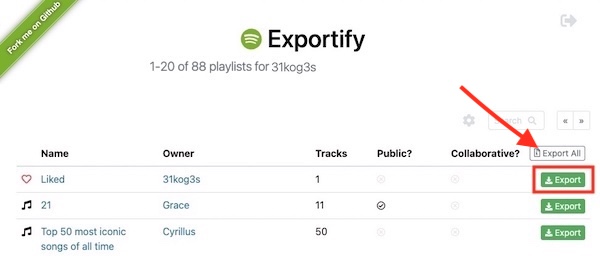
With the Settings button (the gear icon), you can choose what content (data of artists, audio features, and album) to include in the exported Excel file of your playlists. To log out of Exportify, click the Log Out button (the exit icon) in the top-right corner.

Once the export is complete, you can open your playlist CSV files in Excel or Google Sheets. These files provide detailed information about each track within the playlist, including the Track URI, Track Name, Artist Name, Album Name, Album Release Date, and more.
You can import CSV files to Spotify as playlists. Spotify supports copy-and-paste track URIs in playlists, and there are third-party tools that can help you transfer CSV files to playlists on Spotify.
Once your playlists are saved as CSV files using Exportify, it is straightforward to re-import them into Spotify. Just follow the steps below. Keep in mind that this method only works on the Spotify desktop app.
Step 1. Launch your Spotify desktop app on your Mac or Windows computer. Navigate to Your Library, and tap the + button to create a new playlist.

Step 2. Open the CSV file for the playlist you want to re-import in Excel. Select and copy the track URIs look like: spotify:track:xxx.

Step 3. Go to Spotify and paste the URIs into the new playlist you created. Remember to use the keyboard shortcut Ctrl+V on your PC, or Command+V on your Mac.

Step 4. The tracks with the pasted URIs now appear in the new playlist. The playlist has been successfully re-imported to Spotify.

A playlist transfer tool can help you convert playlists or music libraries from one music streaming platform to another. Usually, they also support transferring your uploaded CSV and TXT files into playlists on various platforms. TuneMyMusic is an online tool that offers such functionality, and its free version allows you to transfer up to 500 tracks. Here is a guide on how to import CSV files as Spotify playlists using TuneMyMusic:
Step 1. Visit TuneMyMusic.com and click “Let’s start“.

Step 2. Choose “Upload file” as the source that you want to transfer playlists from.

Step 3. Choose a CSV file created by Exportify on your device, or directly drag the file to the box.

Step 4. Set the song name and artist name as the corresponding column title in the CSV file, and select “Put all songs in one big playlist” for “Separate playlists by”. Then click Continue.

Step 5. TuneMyMusic will show the songs in your playlist. Click Choose Destination and select Spotify.

Step 6. Click the pencil icon to edit the playlist name. Then click Start Transfer and wait for TuneMyMusic to transfer the songs into a Spotify playlist. After done, you can find the playlist in your Spotify Library.

In addition to exporting Spotify playlists to Excel, you can also safeguard your music by downloading Spotify songs as MP3 files. Spotify Premium subscribers can download the entire playlist for offline listening. However, downloaded content is accessible only through the Spotify app, reinstalling the app or canceling your subscription may lead to losing these downloads.
To ensure your Spotify downloads are permanent, consider using a smart Spotify music downloader — Pazu Spotify Converter. This software caters to both Spotify Free and Premium users, allowing you to download various types of Spotify songs, playlists, and albums for offline enjoyment. Pazu Spotify Converter can extract Spotify music and convert it into multiple formats, including MP3, M4A, AIFF, WAV, FLAC, and AAC. With this converter, you can preserve your favorite Spotify tracks and transfer them to any MP3-compatible device for uninterrupted listening.
Key features of Pazu Spotify Converter:
Now, let’s learn how to use Pazu Spotify Music Converter to download and convert Spotify songs with a free subscription from the following tutorial.
Download, install, and run Pazu Spotify Converter on your Mac or Windows. Log in to your Spotify account with the built-in web player.

Click the gear icon on the top right corner. Here you can select the output format (AUTO(M4A)/MP3/AAC/FLAC/WAV/AIFF), choose output audio quality, customize the output path, organize the output files in various ways, rename output files, and more.

Use the integrated Spotify web player to search the songs, albums, playlists,s or podcasts you want to download. Click the Add to List button to load all songs in the album or playlist, and uncheck the songs you don’t want to download if there are any.

Click the Convert button to start downloading the Spotify songs to your local computer.
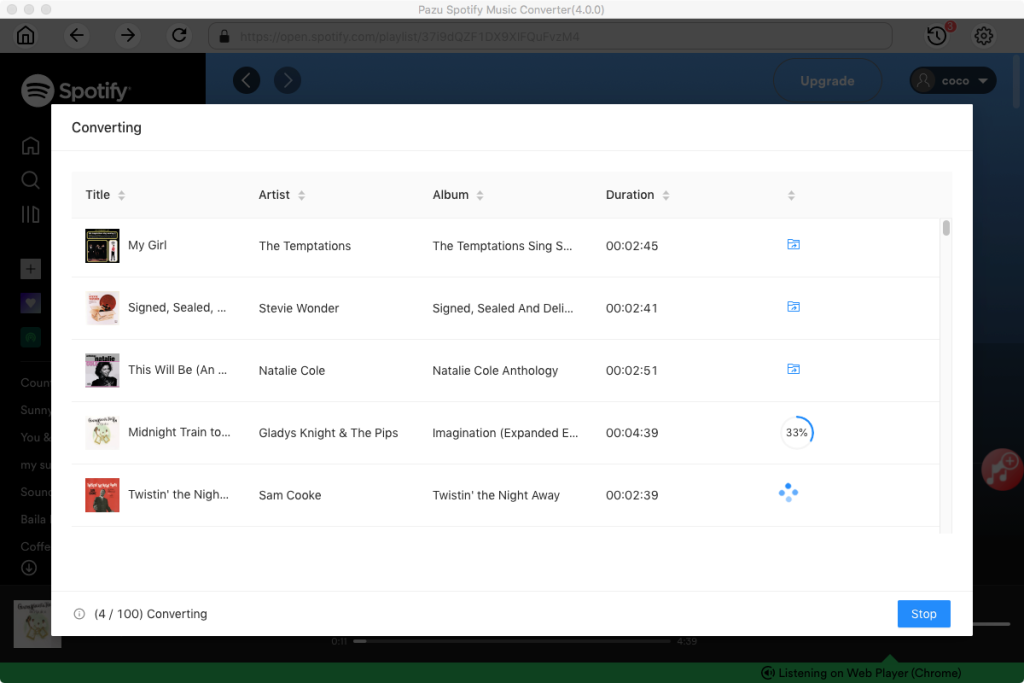
Once the conversion is done, you can find your Spotify songs downloaded as local files by clicking the below folder button or directly going to the output folder you customized in the previous step.
Note: The free trial version of Pazu Spotify Converter enables you to convert the first three minutes of each song. You can remove the trial limitation by purchasing the full version.

Download and convert any Spotify songs, albums, playlists to MP3/M4A etc.