How to download all songs on Apple Music

coco's user avatar
coco
July 20, 2026

Is there a way to download all your songs from Apple Music instead of doing so one by one?

If you want to download your entire Apple Music library at once instead of downloading songs one by one, the best way is to add your entire library to a single playlist. You can easily do this by selecting all your tracks in the desktop app or creating a “Smart Playlist.” Then you could download the playlist. Once all the songs have downloaded, even if you remove the playlist, the music should stay downloaded as they are in the Apple Music library.

After that, you can enable the option to download music automatically when you add it to your Library, so anytime you add a new song or album to your library, Apple Music will download it instantly in the background.

Contents

  1. How to download all songs on Apple Music on Mac/Windows?
  2. How to download all songs on Apple Music on iOS/Android?
  3. Download music that you purchased from the iTunes Store
  4. How to download Apple Music songs automatically?
  5. Why won’t my Apple Music download?
  6. How to download Apple Music to MP3?

Related: How to get Spotify for free?

How to download all songs on Apple Music on Mac/Windows?

As mentioned earlier, you can add all the songs in your Apple Music library to a playlist by selecting all your tracks in the desktop app or creating a “Smart Playlist.” Here’s how:
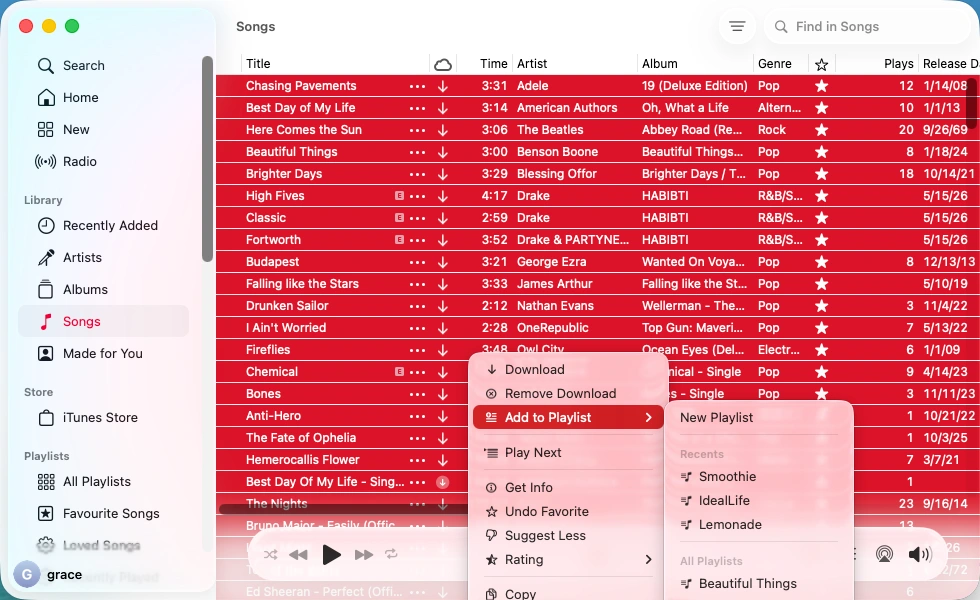
Option 1. Selecting all tracks in Library

  1. Open the Apple Music app on Mac/Windows or iTunes on Windows.
  2. Click Songs under Library on the left side.
  3. Select all songs (Click the first song, press the Shift button, and click the last song).
  4. Right-click the songs and add them to a playlist.
Add all Apple Music library songs to a playlist

5. Open the playlist and click the Download icon.
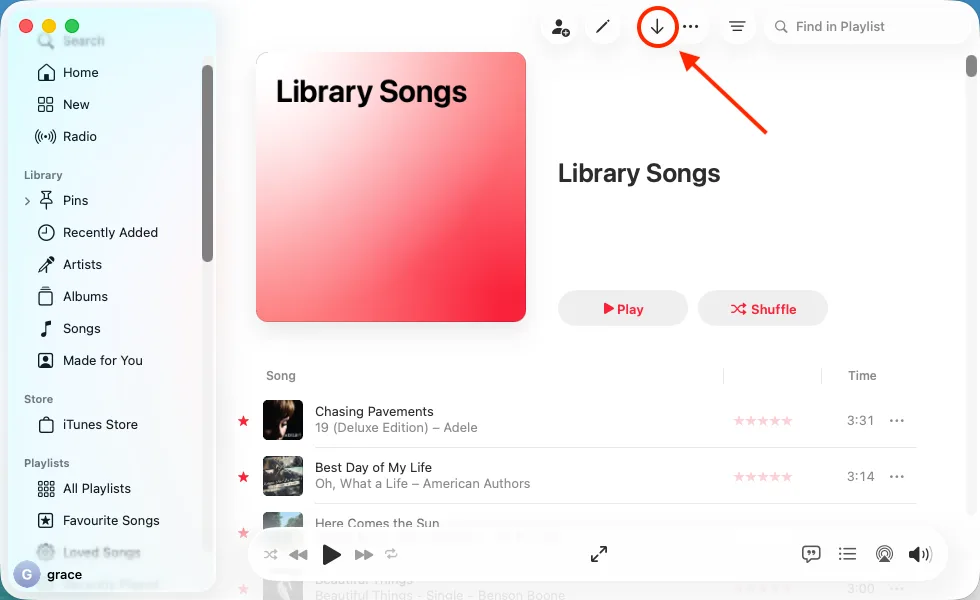
Download all songs in Apple Music library

Option 2. Create a smart playlist

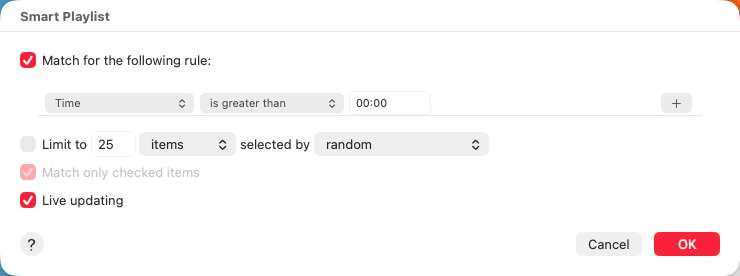
To create a Smart Playlist that catches every single song in your Apple Music library, the easiest rule is based on time. Since every song in the world is longer than zero seconds, this rule will automatically capture 100% of your music.
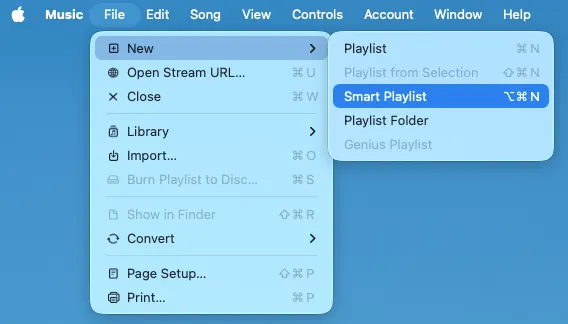
  1. Open the Apple Music app on your Mac or iTunes/Apple Music on Windows.
  2. Go to the top menu and choose File > New > Smart Playlist.
Apple Music Smart Playlist
  1. In the pop-up window, check the box before “Match the following rule” and change the three dropdown fields to [Time] ➔ [is greater than] ➔ [00:00].
  2. Make sure the “Live updating” box at the bottom is checked. So whenever you add a new song to your library in the future, it will automatically be added to this playlist.
  3. Click OK to generate the playlist. Find it in your library, then download all the songs in the playlist.
Apple Music Smart Playlist rule

How to download all songs on Apple Music on iOS/Android?

It’s not convenient to add all songs to a playlist in the Apple Music app on a phone or tablet, so you’d better do this on a computer first, then find the playlist in the Apple Music mobile app and download the playlist.
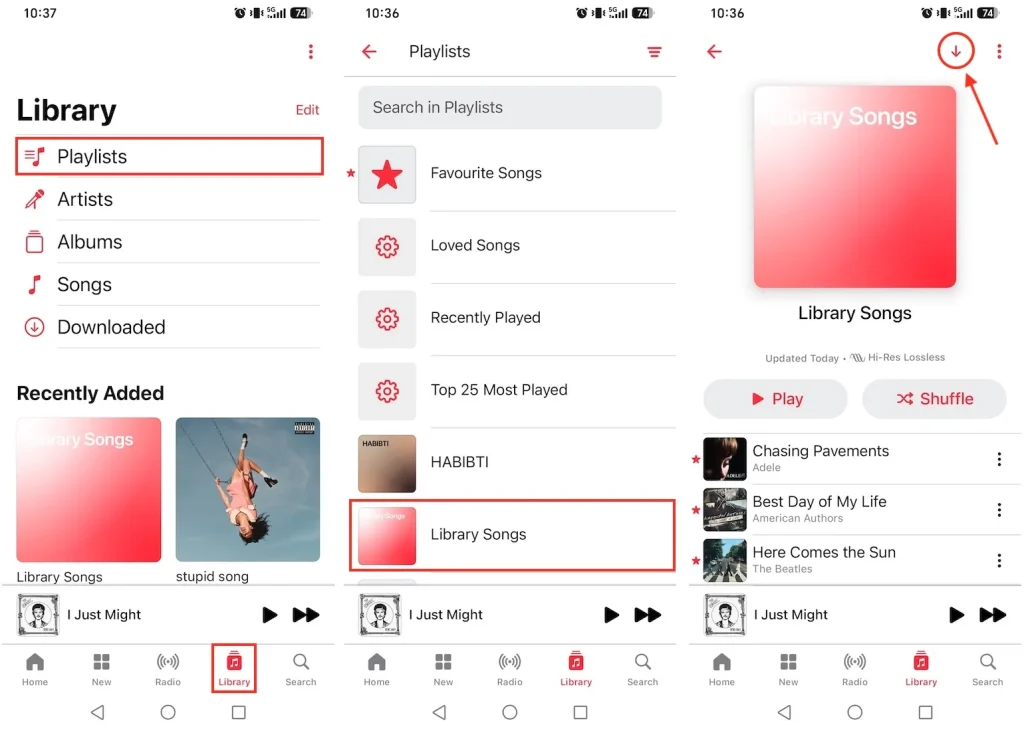
  1. Open the Apple Music app on your Android or iOS device.
  2. Tap Library at the bottom and select Playlists.
  3. Find the playlist that contains all your library songs and tap the download icon at the top.
Download all songs in Apple Music playlist on mobile device

Download purchased music from the iTunes Store

On iPhone or iPad

  1. Open the iTunes Store app. On iPad, tap Purchased. On iPhone, tap More > Purchased.
  2. Tap Music.
  3. Find the music that you want to download, then tap it.
  4. Tap the download button next to a song or album.

On Mac

  1. Open the Apple Music app.
  2. From the menu bar at the top of your screen, choose Account > Purchased/Family Purchases. 
  3. Find the music that you want to download. 
  4. Click the download button next to a song or album.

By default, the songs you downloaded are stored in /Users/[Username]/Music/Music/Media/.
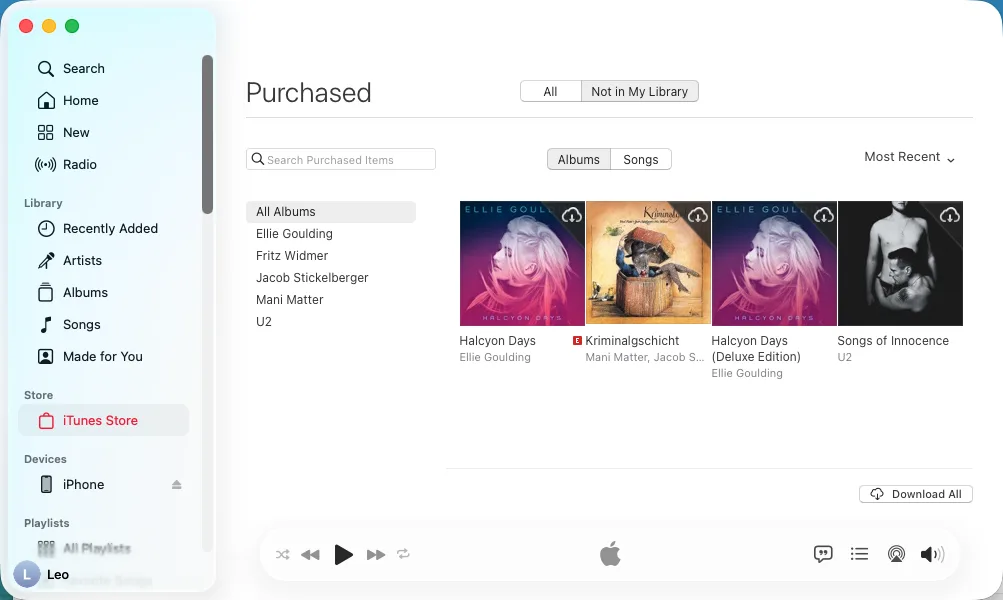
Download purchased music on Mac

On Windows

  1. Open iTunes or the Apple Music app for Windows.
  2. From the menu bar at the top, choose Account > Purchased.
  3. Choose Music from the menu and find the music you want to download. 
  4. Click the download button Download button next to a song or album.

How to download Apple Music songs automatically?

With the Apple Music app on Mac/Windows

  1. Open the Music app on your Mac. Click Music in the menu bar and select Settings.
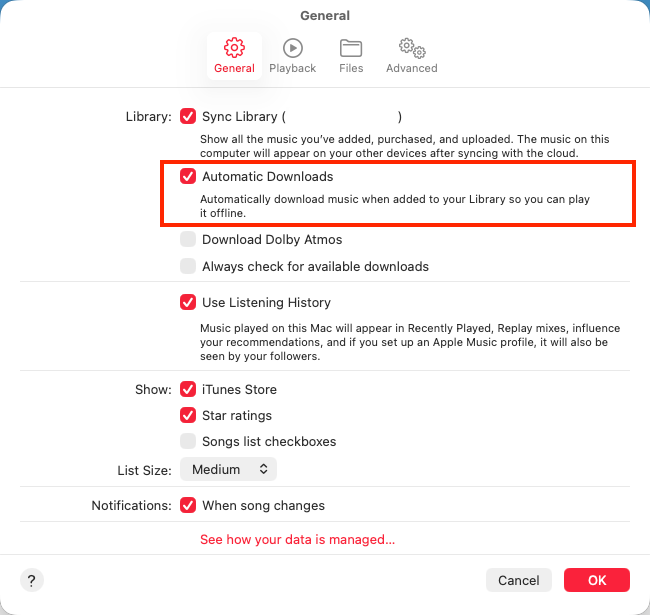
  2. Toggle “Automatic Downloads” to automatically download music for offline listening when it’s added to your Library.
Apple Music Automatic Downloads

On iPhone/iPad

Go to Settings, select Apps > Music, scroll down to the downloads section, and toggle “Automatic Downloads” on.

Apple Music Automatic Downloads iPhone

With iTunes on PC

  1. Open iTunes on your Windows PC.
  2. Select Edit > Preferences, and click Downloads.
  3. Under the Automatic Downloads section, check the box next to Music.
  4. Click OK at the bottom to save your changes.

Why won’t my Apple Music download?

There are several reasons to cause Apple Music won’t download songs, playlists or albums. In this guide, we’ll show you how to fix several common issues causing Apple Music songs won’t download.

1. Check the internet connection

Connect your devices to the Internet over a Wi-Fi or cellular network. Open a webpage or other apps on your device to see whether the network is working.

2. Check your Apple Music subscription

Make sure that your Apple Music subscription hasn’t expired. You can check your subscription details on your account information page.

On Mac
  1. Open the Apple Music app.
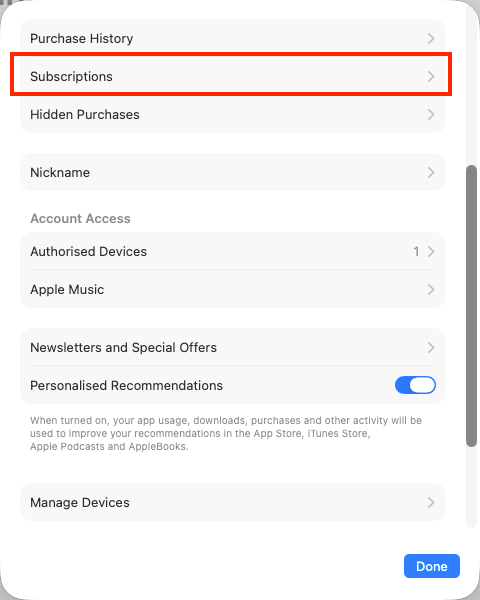
  2. Click Account > Account Settings at the top of the window. You might be asked to sign in.
  3. On the page that appears, click Subscriptions to check whether your Apple Music subscription is active.
Apple Music subscription

On iPhone or iPad

  1. Open the Settings app. 
  2. Tap your name, then tap Subscriptions.
  3. Check whether Apple Music subscription is active.

On Windows

  1. Open the Apple Music app or iTunes on your Windows PC.
  2. Click your name at the bottom left (Apple Music app) or “Account” from the top menu bar (iTunes).
  3. Choose “View My Account.” Sign in to your Apple Account if prompted.
  4. Scroll to the Settings section. Click “Manage” next to Subscriptions to check your Apple Music status.

3. Turn on Sync Library

You must turn on Sync Library to download music from Apple Music to your library. With the latest versions of iOS, iPadOS, and macOS, Sync Library is enabled by default. If you turned off Sync Library, you can turn it back on. Just follow the steps below for your device.

On Mac
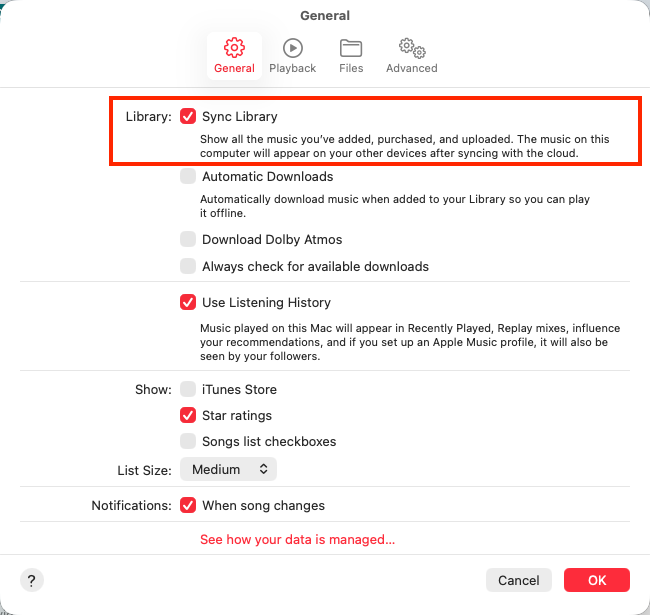
  1. Open the Apple Music app.
  2. From the menu bar at the top of your screen, choose Music > Settings.
  3. Go to the General tab and select Sync Library to turn it on. 
  4. Click OK.
Apple Music sync library

On your iPhone or iPad

  1. Go to Settings >Apps > Music.
  2. Turn on Sync Library.

On your PC with Apple Music for Windows

  1. Open the Apple Music app on your PC. Click the three-dot at the top of the sidebar and select “Settings.”
  2. Click “General” and then turn on “Sync Library.”

On your PC with iTunes for Windows

  1. Open iTunes.
  2. From the menu bar at the top of your screen, choose Edit > Preferences.
  3. Go to the General tab and select iCloud Music Library to turn it on. 
  4. Click OK.

4. Authorize your computer

You must authorize this computer before you can play content saved offline on this computer. To authorize this computer, go to the Account menu and select Authorizations.

5. Update your iPhone or iPad

Before the process, back up your device using iCloud or your computer.

  1. Plug your iPhone or iPad into power and connect to the internet with Wi-Fi.
  2. Go to Settings > General, then tap Software Update.
  3. Choose the software update that you want to install.
  4. Tap Update Now.

6. Remove your device from the previous Apple ID

If you encounter the error below, it means your device is linked to another Apple ID.

Computers and devices can be associated with a different Apple ID once every 90 days. Days remaining indicate the number of days before you can associate that specific computer or device with a different Apple ID.

If you remember the previous Apple ID that your device was linked to, log in to that Apple ID and remove your device.

On your Mac or PC
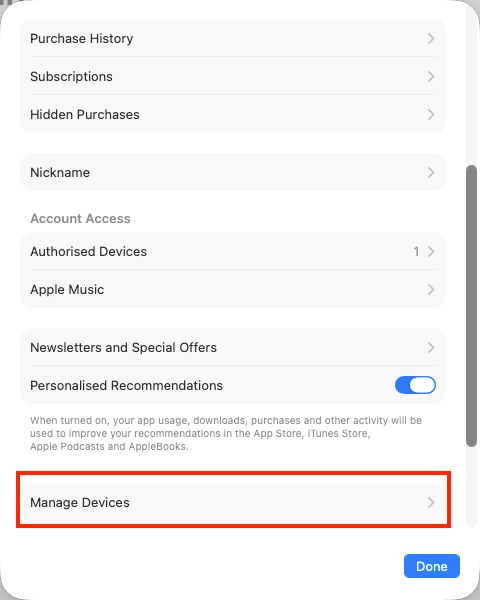
  1. Open the Apple Music app on Mac or Windows, or open iTunes for Windows.
    • Mac: Choose Account > Account Settings from the menu bar.
    • iTunes on PC: Choose Account > View My Account from the menu bar.
    • Apple Music on PC: Click your name and select View My Account.
  2. Sign in with your Apple ID.
  3. Click Manage Devices. If no devices are associated with your Apple ID, this section won’t appear.
  4. If you want to remove a device, click Remove. If you can’t remove a device, sign out of your Apple ID on that device and try again. If you still can’t remove it, you might need to wait up to 90 days to associate the device with a different Apple ID.
Apple Music manage devices

On your iPhone or iPad

  1. Tap Settings, tap your name, then tap Media & Purchases.
  2. Tap View Account. You might be asked to sign in.
  3. Scroll down, then tap Remove This Device.

7. Make sure Apple Music songs, albums, and playlists are added to the Library.

You can download Apple Music songs, albums, and playlists after you have added them to the Library or Playlist.

How to add music from Apple Music on your iPhone, iPad, or Android?
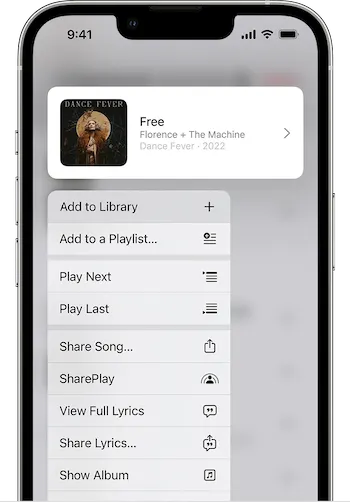
  1. Open the Apple Music app.
  2. Touch and hold a song, album, or playlist that you want to add to your library.
  3. Tap Add to Library or Add to a Playlist.
Add to Apple Music library

How to add music from Apple Music on Mac or PC?

  1. Open the Apple Music app or iTunes. 
  2. Find music that you want to add to your library.
  3. Click the Add buttonAdd button next to a song or in the top-right corner of an album and playlist.
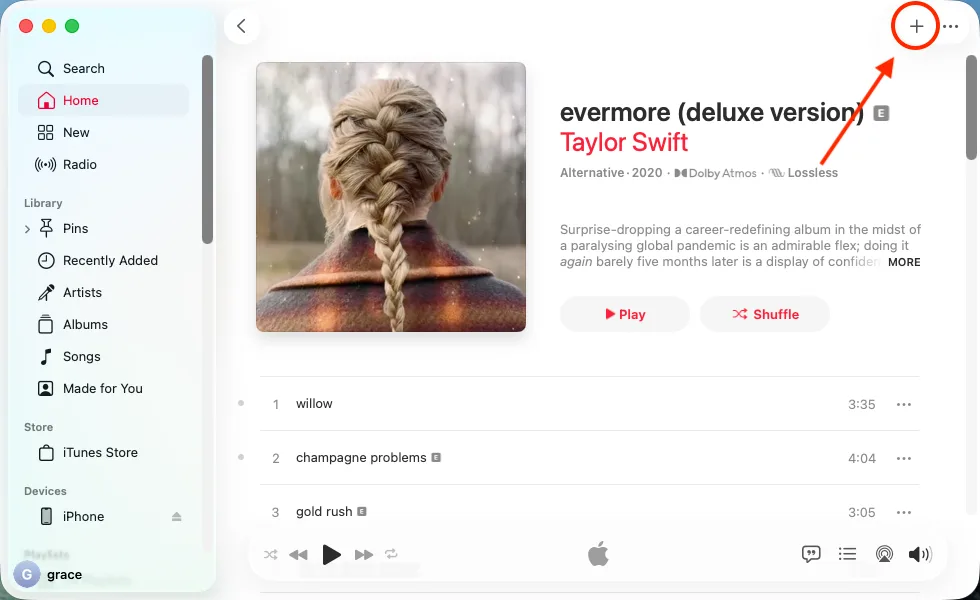
Add to Apple Music library

8. Check the cloud status of songs

  1. On your Mac, open the Apple Music app. On your PC, open iTunes, choose Music from the pop-up menu, then click Library.
  2. In the sidebar, select Songs.
  3. In the menu bar, choose View > Show View Options.
  4. Select Cloud Status and Cloud Download.

If you see “No Longer Available” next to a song that’s grayed out, the song was added from Apple Music and was removed from the Apple Music catalog. These songs can’t be downloaded.

How to download Apple Music to MP3?

If you often encounter kinds of issues while downloading songs from Apple Music, you can use this third-party Apple Music downloading tool – Pazu Apple Music Converter.

Pazu Apple Music Converter lets you convert Apple Music and iTunes songs you have in your library to MP3, AAC, WAV, FLAC, M4A, and AIFF without any loss in quality. One of the distinguishing features of Pazu Apple Music Converter is that it can download and convert Apple Music at a really fast speed — almost 10 times faster than any other similar software. It is integrated with the Apple Music web player, so you can batch convert any Apple Music playlist or album to the format you choose without the Apple Music or iTunes app. The following tutorial will show you how to download Apple Music to MP3 and get Apple Music for free. 

In addition, Pazu Apple Music Converter can recognize and identify tracks as it downloads, and automatically tag the files with the relevant artist name, track title, album tags as it goes. The downloaded songs are fully searchable by artist, title or album, creating your entire music library simply and quickly.

Step 1. Launch Pazu Apple Music Converter

Download, install and run Pazu Apple Music Converter on your Mac or Windows.
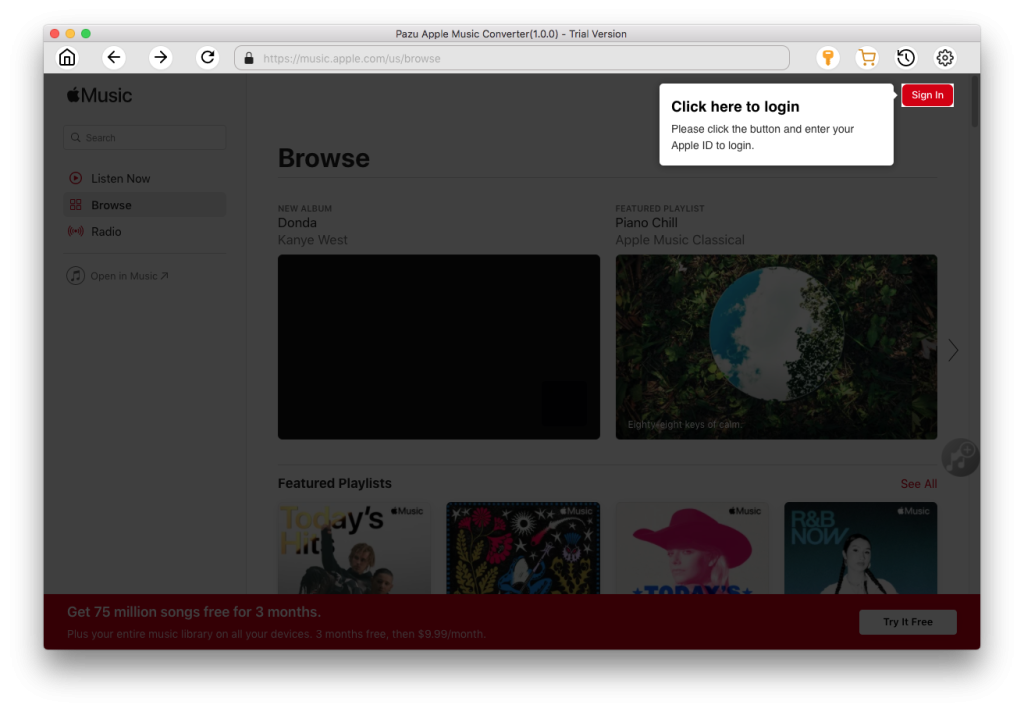
Apple Music Converter

Step 2. Choose download format

The default format is M4A. Apple Music Converter also supports MP3, AAC, FLAC, WAV, and AIFF. Click the gear icon to change the output format or folder.
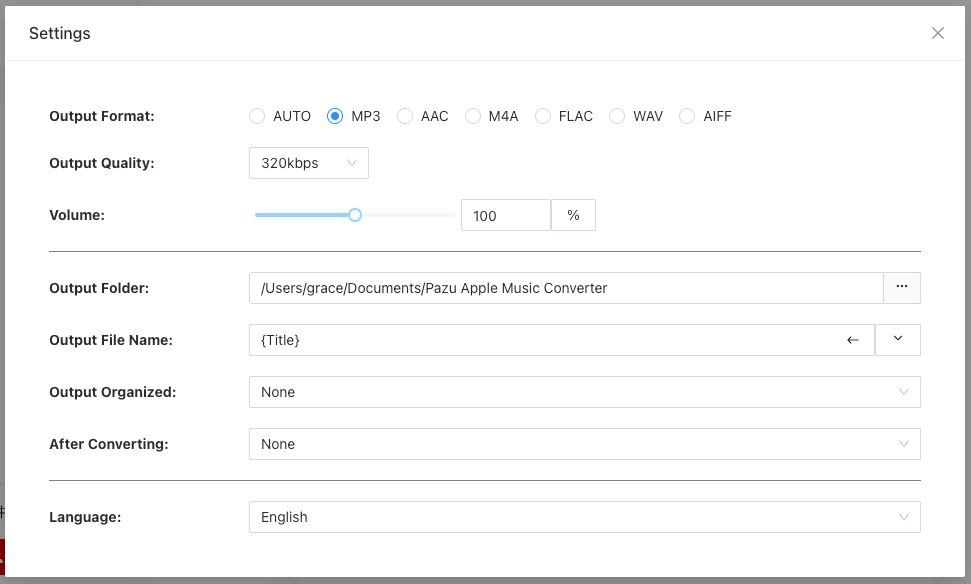
Apple Music converter settings

Step 3. Download Apple Music songs

Use the built-in Apple Music player to find the playlist, artist, or album that you want to download. Click the red “Add songs” button to add the tracks to the download list.
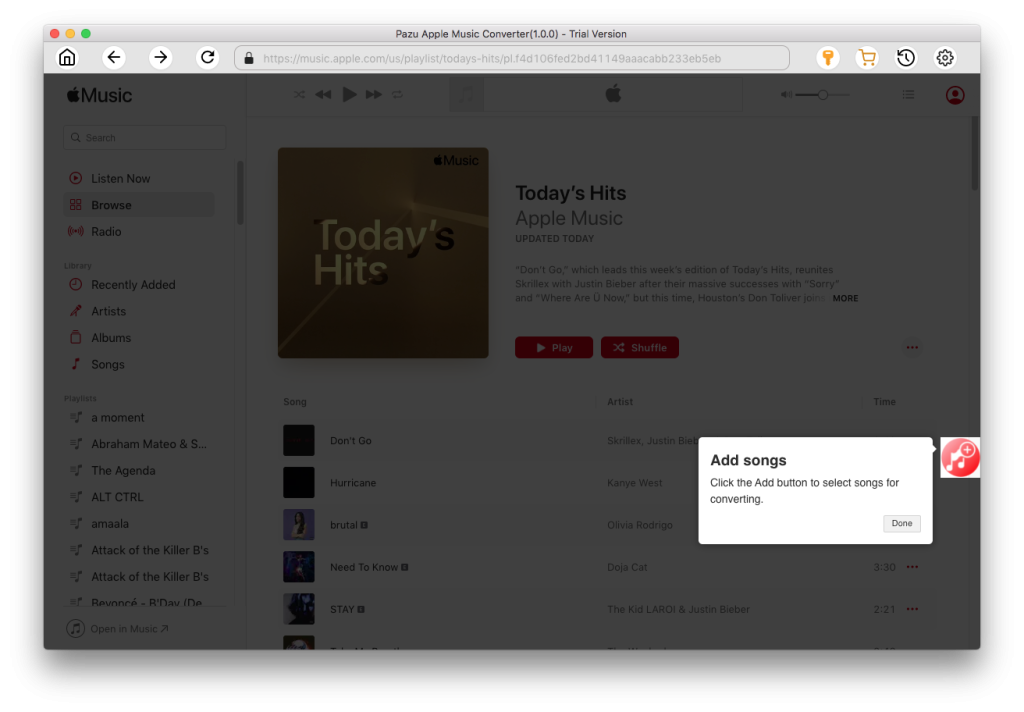
add Apple Music songs

Uncheck tracks you don’t want to download and click the “Convert” button to start downloading Apple Music songs, albums, and playlists to MP3.

Once you’re done, you can play downloaded files on any device you want, such as your phone, tablet, or MP3 player, even after canceling your Apple Music subscription. You can also upload Apple Music songs to Amazon Music, Spotify, YouTube Music, etc.
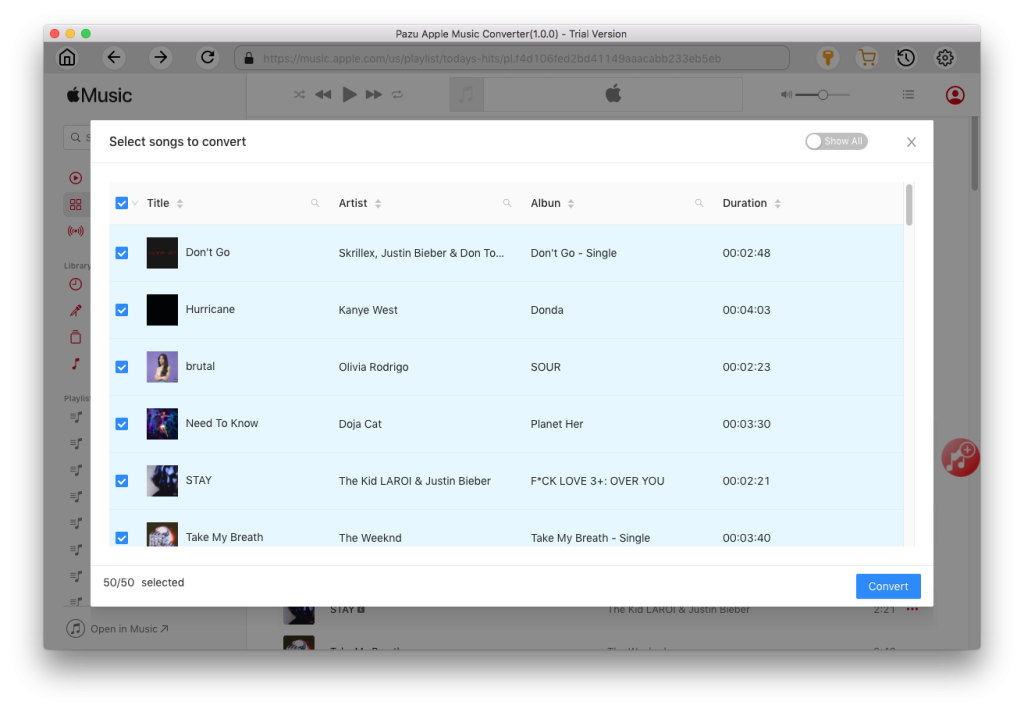
convert Apple Music to MP3