iCloud Music Library lets Apple users sync and share all the music tracks from Apple Music and iTunes to all devices. When signed in to the same iCloud account on all devices, the feature will sync all of your songs, albums, and playlists regardless of whether you uploaded and bought them on your Mac, PC, iPhone, or iPad.
iCloud Music Library has come a long way since it first launched with Apple Music in 2015, but errors are bound to croup up. What kind of errors? The service can be buggy, with album artwork missing or live tracks getting matched to studio versions. The worst case is when music sometimes just disappears completely. Fortunately, you can disable or turn off iCloud Music Library. In the following sections, we will explain what iCloud Music Library is, cover its pros and cons, and show how to turn off iCloud Music Library.
iCloud Music Library is a feature in iOS, PC, and macOS that allows you to access and synchronize your songs, albums, and playlists across all of your Apple devices signed in to the same iCloud account. It will synchronize not only purchases, but also existing content in your music library that you’ve imported from CDs or other sources across your iPhone, iPad, iPod touch, PC, and Mac. There are several plans you can subscribe to from a free 5 GB or a family plan (up to 1 TB, $9.99 per month). With iCloud Music Library, you can stream and download tracks listed on the iTunes Store to up to 10 devices. It also allows you to store up to 100 000 songs with Apple Music or iTunes Match subscription.
Advantages of iCloud Music Library:
If you subscribe to Apple Music or iTunes Match, you can make your entire iCloud Music Library available on all your devices when you’re signed in with the same Apple ID. You can access your library any time, whenever you’re connected to the internet.
Your iCloud Music Library can keep the following available in the cloud:
Up to 100,000 songs, not including songs (or music videos) purchased from the iTunes Store; files can be no larger than 200 MB.
Matched songs (songs available in the iTunes Store, whether or not you purchased them there) at iTunes Plus quality (256 kbps DRM-free AAC) and other songs at their original quality.
Music videos purchased in the iTunes Store.
Playlists that include only songs.
Smart Playlist rules, which are applied on the computer or device they’re downloaded to.
Disadvantages of iCloud Music Library:
However, by enabling this feature, you may find disadvantages listed below,
iCloud Music Library is prone to messing up metadata of your tracks.
Manual sync to iTunes Music is not available on iPhone.
Restricted in some regions of the world. Check if iCloud Music Library is available in your country here.
It’s a paid service along with Apple Music or iTunes Match.
iCloud Music Library is enabled by default on your iPhone and Mac when you get an Apple Music or iTunes Match subscription.
If you think the disadvantages are something that you can not handle, then you can disable the iCloud Music Library. Keep reading to learn how to disable the iCloud Music Library.
iCloud Music Library, Sync Library, and Cloud Music Library are just different names for the same feature.
With the latest version of iOS, iPadOS, and macOS, Sync Library is turned on by default. If you need to turn it off, just follow the steps below for your device.
On your iPhone, iPad, or iPod touch
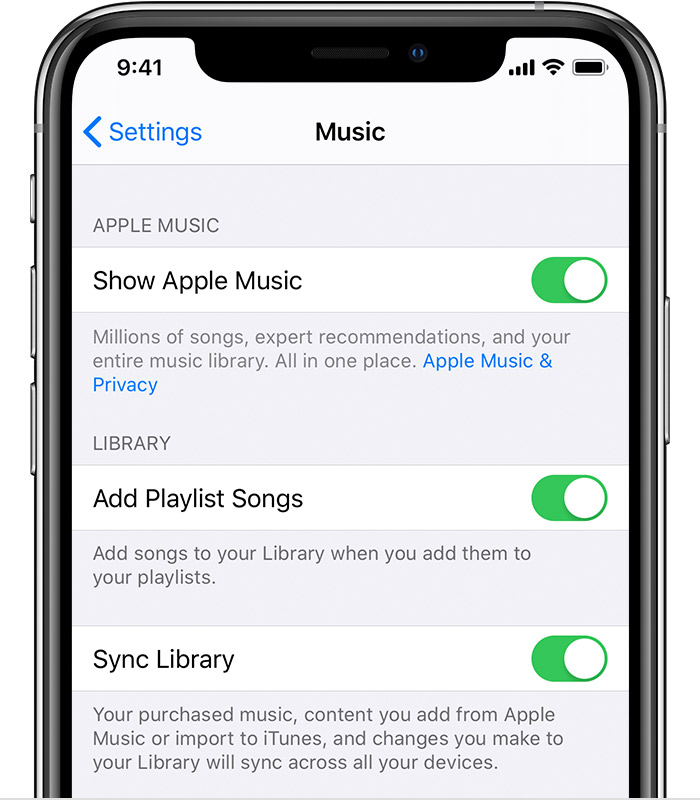
1. Go to Settings > Music.
2. Turn off Sync Library. If you don't subscribe to Apple Music or iTunes Match, you won’t see this option.
On your Mac
1. Open the Apple Music app.
2. From the menu bar at the top of your screen, choose Music > Preferences.
3. Go to the General tab and select Sync Library to turn it off. If you don't subscribe to Apple Music or iTunes Match, you won’t see it.
4. Click OK.

On your PC with iTunes for Windows
1. Open iTunes.
2. From the menu bar at the top of your screen, choose Edit > Preferences.
3. Go to the General tab and select iCloud Music Library to turn it off. If you don't subscribe to Apple Music or iTunes Match, you won’t see it.
4. Click OK.
The iCloud Music Library syncs more reliably now, and keeps everything in order. The vast majority of people's libraries shouldn't see the above errors, but regardless: Before spinning up iCloud Music Library, you should make a backup of your music library. If you have a lot of files that you are afraid might be messed up, in case anything goes pear-shaped, you have a place to reset.
The files which are downloaded from Apple Music have DRM on them, which means that you will not be able to play them once you cancel your subscription. It is much better to have a copy of all your music stored on your external hard drive or in any other location. If you want to keep the files you downloaded from Apple Music forever, you can turn to a third-party program — Pazu Apple Music Converter.
Pazu Spotify Converter can remove protection from your Apple Music contents and convert Apple Music to unprotected audio files including MP3, M4A, AAC, WAV, FLAC or AIFF. It can preserve all ID3 tags and other metadata info in the music downloads, including title, artist, year, album, genre, and so forth. It supports batch convert Apple Music songs at up to 5X converting speed. It will bring a great nice listening experience for you. In the following tutorial, we will show you how to download Apple Music songs by Pazu Apple Music Converter.

Download, install and run Pazu Spotify Converter on your Mac or Windows. Log in your Spotify account with the built-in Spotify web player. The steps are the same whether you have the Mac or Windows version of Pazu Spotify Converter.

Use the integrated Spotify web player to search the songs, album, playlist or podcast you want to download. Click the Add to list button to load all songs in the album or playlist, uncheck the songs you don’t want to download if there are any.
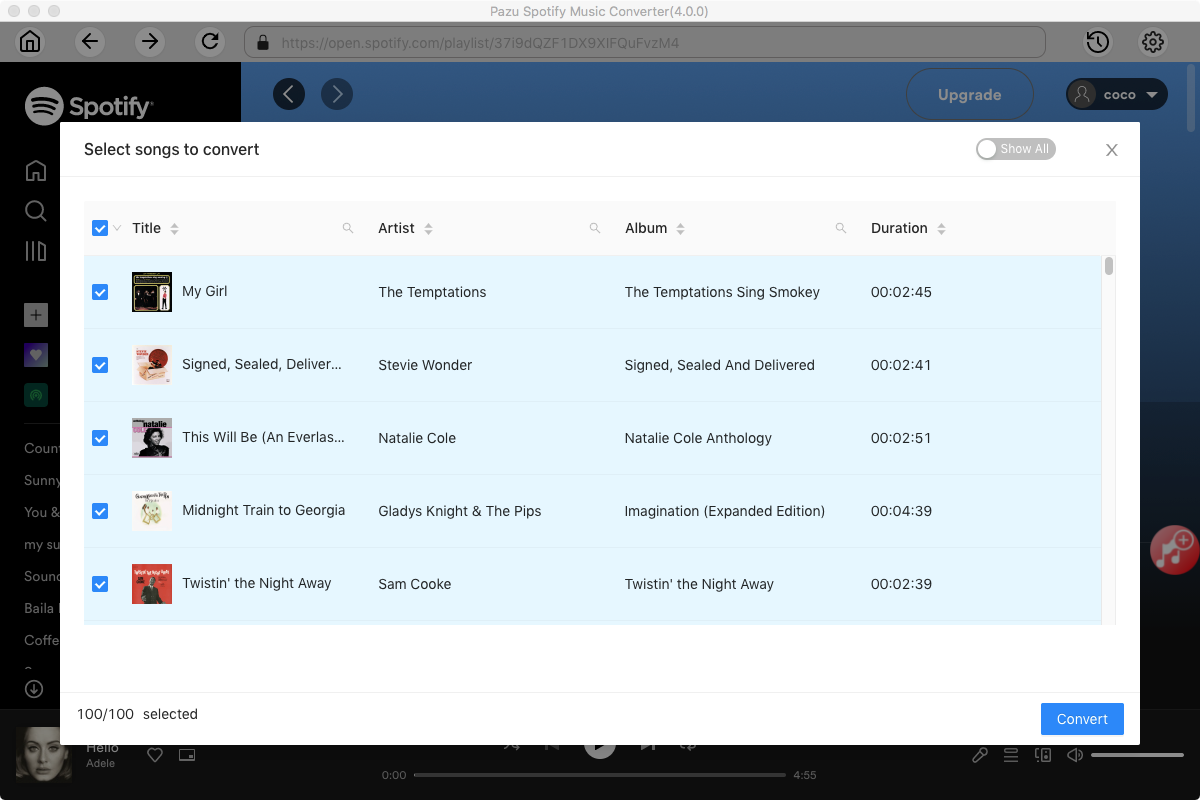
Click the gear icon on the top right corner to open Settings. Here you can select output format (MP3/M4A/AAC/FLAC/WAV/AIFF), choose output audio quality, cover quality, change the output path, organize the output files in various ways, rename output files and more.

Click Convert button to start downloading the Spotify songs to your local computer.

Once the conversion is done, you can find your Spotify songs downloaded as local files by clicking below folder button or directly going to the output folder you customized in the previous step. You can transfer them to your file manager or manage them anywhere you want.

Note: The free trial version of Pazu Spotify Converter enables you to convert the first three minutes of each song. You can remove the trial limitation by purchasing the full version.
Buy Now Buy Now
Download and convert any Spotify songs, albums, playlists to MP3/M4A etc.